With Docker, the most predominant container runtime in the enterprise, how can you perform Docker backup and protect critical containers?
Application and data
Backing up your containers usually involves backing up the container itself (the application) and the container data. If you have persistent data, it is best to have it mounted on the host or some other storage location where the data can be protected outside the container. Even virtual machine backups will do if your container host is a VM.
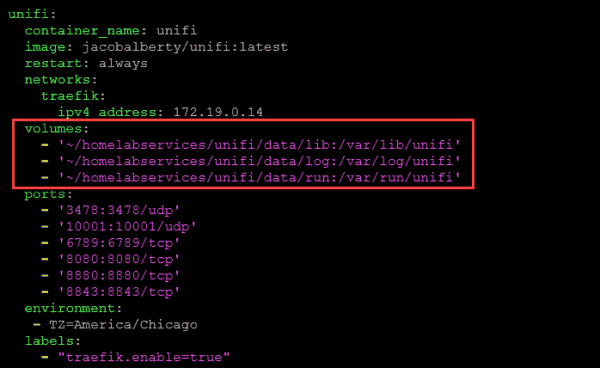
The folder below, “/homelabservices/unifi/data/lib,” is a persistent folder on the Docker container host.
Looking at persistent volume data mounted for a container
Built-in Docker commands for container backup
The following built-in Docker container commands allow you to back up the container and images:
docker commit
docker save
docker export
Docker commit
With the docker commit command, you can save the running container to a new image, including the changes you made to the running container. It is a handy command if you start the container from a specific image and then need to make several changes. In addition, the commit command can save the currently running container to a container image.
With regard to the Docker backup container process, this is an excellent command to save an image of your currently running container. Use the following command:
Docker commit to save a running container to a new image
Docker save
The docker save command allows you to save one or more images to a TAR file. In addition, the save command preserves the image layer information, including history and metadata. Once you have the TAR file, you can copy it to a new container host and run the docker load command to load the saved images onto the new Docker host.
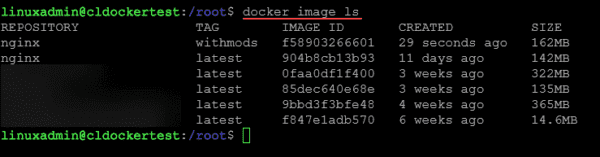
Below, we use the following command to list the images and see the newly created image:
docker image ls
Docker image ls command to list image
Once you have a TAR file backup of the Docker image, you can run the docker load command to load the image from the TAR file using the following:
docker load -I <tar file name>
Loading a Docker image from a TAR file
Docker export
With the docker export command, you can export the file system contents for a specific container as a TAR archive file. Using the docker import command, you can then import the TAR file as a Docker image. Since the docker export command captures the file system, it can be used to grab the data that exists in the container, which allows the data to be backed up/moved.
Use the following command to export the file system of a Docker container:
docker export <container name> > <tar file name>
Running a docker export command to export the container file system
You can untar the TAR file and mount it into a directory that contains the exported data. After untarring the file, we use the ls command to list the contents of the container file system.
Listing directory contents for the TAR file
Docker backup container process
Let’s look at backing up a container on one Docker host and restoring the backup on either the same or a different host. In the walkthrough, we will take a running Nginx container, modify a file within the container, commit the container to a new image, and then save the container as a TAR file that we can move off the Docker host.
Using the commands above to back up your container, use the following workflow:
Backing up the container application
You can use the following tools to back up your container application:
Use docker commit to commit your running container to a new image.
Use docker save to save the image to a TAR file.
Backing up your container application data
To back up the container application data mounted in a persistent folder on your Docker host, you can use VM-level image backup tools provided by your data protection solution to grab a low-level copy of your container data. However, you can also use the docker export command to export the contents of your running container file system to have a copy of your data.
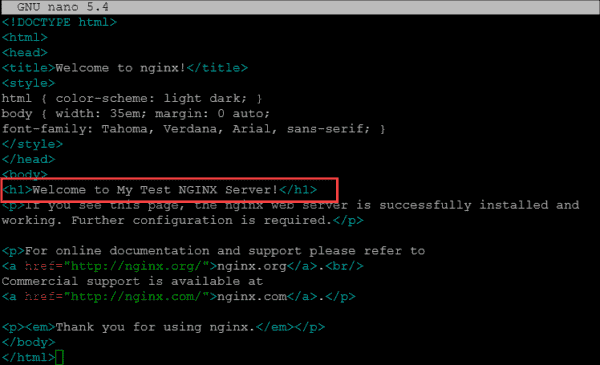
Below, we have modified the configuration for an Nginx container, thereby customizing the Nginx configuration file.
Modifying an Nginx container configuration
After using the docker commit and docker save commands to save the image to a TAR file, you can use the docker load command to load the container into your image repositories on your target Docker host. You can copy your data to the appropriate folders if you have persistent data that needs mounting.
After loading the image and running the container, you can see that the loaded container image includes the configuration changes. You can load a saved Docker container image using the following command:
docker load -i <tar file from save command>
Loading the container image on the target Docker host
On the target Docker container host, spinning up a new Nginx container using the committed/saved image includes the changes as expected.
You may have seen digital certificate files with a variety of filename extensions, such as .crt, .cer, .pem, or .der. These extensions generally map to two major encoding schemes for X.509 certificates and keys: PEM (Base64 ASCII), and DER (binary). However, there is some overlap and other extensions are used, so you can’t always tell what kind of file you are working with just from looking at the filename; you may need to open it in a text editor and take a look for yourself.
As you work with digital certificates, you may find yourself with the need to convert between PEM and DER files, view their contents as human-readable text, or combine them into common container formats like PKCS#12 or PKCS#7. This guide points out the major differences between PEM and DER files and common filename extensions associated with them. It also provides visual examples of each encoding, and illustrates some common file format conversions with OpenSSL.
What is OpenSSL? OpenSSL is a very useful open-source command-line toolkit for working with X.509 certificates, certificate signing requests (CSRs), and cryptographic keys. If you are using a UNIX variant like Linux or macOS, OpenSSL is probably already installed on your computer. If you would like to use OpenSSL on Windows, you can enable Windows 10’s Linux subsystem or install Cygwin.
Need an SSL certificate? SSL.com has you covered. Compare certificates to find the right choice for you, from S/MIME and code signing certificates and more.
PEM
PEM (originally “Privacy Enhanced Mail”) is the most common format for X.509 certificates, CSRs, and cryptographic keys. A PEM file is a text file containing one or more items in Base64 ASCII encoding, each with plain-text headers and footers (e.g. -----BEGIN CERTIFICATE----- and -----END CERTIFICATE-----). A single PEM file could contain an end-entity certificate, a private key, or multiple certificates forming a complete chain of trust. Most certificate files downloaded from SSL.com will be in PEM format.
PEM Filename Extensions
PEM files are usually seen with the extensions .crt, .pem, .cer, and .key (for private keys), but you may also see them with different extensions. For example, the SSL.com CA bundle file available from the download table in a certificate order has the extension .ca-bundle.
What does a PEM certificate look like?
The SSL/TLS certificate for www.ssl.com is shown below in PEM format (click to view):
Click to View PEM certificate
Common PEM Conversions
In the OpenSSL commands below, replace the filenames in ALL CAPS with the actual paths and filenames you are working with.
View contents of PEM certificate file
openssl x509 -in CERTIFICATE.pem -text -noout
Convert PEM certificate to DER
openssl x509 -outform der -in CERTIFICATE.pem -out CERTIFICATE.der
Convert PEM certificate with chain of trust to PKCS#7
PKCS#7 (also known as P7B) is a container format for digital certificates that is most often found in Windows and Java server contexts, and usually has the extension .p7b. PKCS#7 files are not used to store private keys. In the example below, -certfile MORE.pem represents a file with chained intermediate and root certificates (such as a .ca-bundle file downloaded from SSL.com).
Convert PEM certificate with chain of trust and private key to PKCS#12
PKCS#12 (also known as PKCS12 or PFX) is a common binary format for storing a certificate chain and private key in a single, encryptable file, and usually have the filename extensions .p12 or .pfx. In the example below, -certfile MORE.pem adds a file with chained intermediate and root certificates (such as a .ca-bundle file downloaded from SSL.com), and -inkey PRIVATEKEY.key adds the private key for CERTIFICATE.crt(the end-entity certificate). Please see this how-to for a more detailed explanation of the command shown.
After executing the command above you will be prompted to create a password to protect the PKCS#12 file. Remember this password. You will need it to access any certificates and keys stored in the file.
DER
DER (Distinguished Encoding Rules) is a binary encoding for X.509 certificates and private keys. Unlike PEM, DER-encoded files do not contain plain text statements such as -----BEGIN CERTIFICATE-----. DER files are most commonly seen in Java contexts.
DER Filename Extensions
DER-encoded files are usually found with the extensions .der and .cer.
What does a DER-encoded certificate look like?
The DER-encoded SSL/TLS certificate for www.ssl.com is shown below (click to view):
Click to View DER certificate
Common DER Conversions
In the OpenSSL commands below, replace the filenames in ALL CAPS with the actual paths and filenames you are working with.
View contents of DER-encoded certificate file
openssl x509 -inform der -in CERTIFICATE.der -text -noout
Convert DER-encoded certificate to PEM
openssl x509 -inform der -in CERTIFICATE.der -out CERTIFICATE.pem
Convert DER-encoded certificate with chain of trust and private key to PKCS#12
To convert a DER certificate to PKCS#12 it should first be converted to PEM, then combined with any additional certificates and/or private key as shown above. For a more detailed description of converting DER to PKCS#12, please see this how-to.
Secure Sockets Layer (SSL) and Transport Layer security (TLS ) are protocols that provide secure communications over a computer network or link.
They are commonly used in web browsing and email.
In this tutorial we will look:
TLS and SSL
Public and Private keys
Why we need certificates and what they do
How to get a digital certificate and understand the different common certificate types.
What is TLS
TLS is based on SSL and was developed as a replacement in response to known vulnerabilities in SSLv3.
SSL is the term commonly used, and today usually refers to TLS.
Security Provided
SSL/TLS provides data encryption, data integrity and authentication.
This means that when using SSL/TLS you can be confident that
No one has read your message
No one has changed your message
You are communicating with the intended person (server)
When sending a message between two parties you have two problems that you need to address.
How do you know that no one has read the message?
How do you know that no one has changed the message?
The solutions to these problems are to:
Encrypt it.– This makes the content unreadable so that to anyone viewing the message it is just gibberish.
Sign it– This allows the recipient to be confident that it was you who sent the message, and that the message hasn’t been changed.
Both of these processes require the use of keys.
These keys are simply numbers (128 bit being common) that are then combined with the message using a particular method, commonly known as an algorithm- e.g. RSA, to either encrypt or sign the message.
Symmetrical Keys and Public and Private Keys
Almost all encryption methods in use today employ public and private keys.
These are considered much more secure than the old symmetrical key arrangement.
With a symmetrical key, a key is used to encrypt or sign the message, and the same key is used to decrypt the message.
This is the same as the keys (door, car keys) we deal with in everyday life.
The problem with this type of key arrangement is if you lose the key anyone who finds it can unlock your door.
With Public and Private keys, two keys are used that are mathematically related (they belong as a key pair), but are different.
This means a message encrypted with a public key cannot be decrypted with the same public key.
To decrypt the message you require the private key.
If this type of key arrangement were used with your car. Then you could lock the car, and leave the key in the lock as the same key cannot unlock the car.
This type of key arrangement is very secure and is used in all modern encryption/signature systems.
Keys and SSL Certificates
SSL/TLS use public and private key system for data encryption and data Integrity.
Public keys can be made available to anyone, hence the term public.
Because of this there is a question of trust, specifically:
How do you know that a particular public key belongs to the person/entity that it claims to be.
For example, you receive a key claiming to belong to your bank.
How do you know that it does belong to your bank?
The answer is to use a digital certificate.
A certificate serves the same purpose as a passport does in everyday life.
A passport established a link between a photo and a person, and that link has been verified by a trusted authority (passport office).
A digital certificate provides a link between a public key and an entity (business,domain name etc) that has been verified (signed) by a trusted third party ( A certificate authority)
A digital certificate provides a convenient way of distributing trusted public encryption keys.
Obtaining a Digital Certificate
You get a digital certificate from a recognized Certificate authority (CA). Just like you get a passport from a passport office.
In fact the procedure is very similar.
You fill out the appropriate forms add your public keys (they are just numbers) and send it/them to the certificate authority. (this is a certificate Request)
The certificate authority does some checks ( depends on authority), and sends you back the keys enclosed in a certificate.
The certificate is signed by the Issuing Certificate authority, and this it what guarantees the keys.
Now when someone wants your public keys, you send them the certificate, they verify the signature on the certificate, and if it verifies, then they can trust your keys.
Example Usage
To illustrate we will look at a typical web browser and web server connection using SSL. (https).
This connection is used on the Internet to send email in Gmail etc and when doing online banking,shopping etc.
Browser connects to server Using SSL (https)
Server Responds with Server Certificate containing the public key of the web server.
Browser verifies the certificate by checking the signature of the CA. To do this the CA certificate needs to be in the browser’s trusted store( See later)
Browser uses this Public Key to agree a session key with the server.
Web Browser and server encrypt data over the connection using the session key.
Here is a video that covers the above in more detail:
Digital Certificate Types
If you are trying to purchase a certificate for a website or to use for encrypting MQTT you will encounter two main types:
Domain Validated Certificates (DVC)
Extended validation Certificates (EVC)
The difference in the two types is the degree of trust in the certificate which comes with more rigorous validation.
The level of encryption they provide is identical
A domain-validated certificate (DV) is an X.509 digital certificate typically used for Transport Layer Security (TLS) where the identity of the applicant has been validated by proving some control over a DNS domain.-WikI
The validation process is normally fully automated making them the cheapest form of certificate. They are ideal for use on websites like this site that provides content, and not used for sensitive data.
An Extended Validation Certificate (EV) is a certificate used for HTTPS websites and software that proves the legal entity controlling the website or software package. Obtaining an EV certificate requires verification of the requesting entity’s identity by a certificate authority (CA).
They are generally more expensive than domain validated certificates as they involve manual validation.
Certificate Usage Restrictions- Wildcards and SANs
Generally a certificate is valid for use on a single fully qualified domain name (FQDN).
That is a certificate purchased for use on www.mydomain.com cannot be used on mail.mydomain.com or www.otherdomain.com.
However if you need to secure multiple subdomains as well as the main domain name then you can purchase a Wildcard certificate.
A wildcard certificate covers all sub domains under a particular domain name.
For example a wildcard certificate for *.mydomain.com can be used on:
mail.mydomain.com
www.mydomain.com
ftp.mydomain.com
etc
It cannot be used to secure both mydomain.com and myotherdomain.com.
To cover several different domain names in a single certificate you must purchase a certificate with SAN (Subject Alternative Name).
These generally allow you to secure 4 additional domain names in addition to the main domain name. For example you could use the same certificate on:
www.mydomain.com
www.mydomain.org
www.mydomain.net
www.mydomain.co
www.mydomain.co.uk
You can also change the domain name covered but would need have the certificate re-issued.
Why use Commercial Certificates?
It is very easy to create you own SSL certificates and encryption keys using free software tools.
These keys and certificates are just as secure as commercial ones, and can in most cases be considered even more secure.
Commercial certificates are necessary when you need widespread support for your certificate.
This is because support for the major commercial certificate authorities is built into most web browsers, and operating systems.
If I installed my own self generated certificate on this site when you visited you would see a message like the one below telling you that the site is not trusted.
===============
Certificate Encodings and Files Extensions
Certificates can be encoded as:
Binary files (.DER)
ASCII (base64)files (.PEM)
Common file extensions in use are:
.DER
.PEM (Privacy Enhanced Electron Mail)
.CRT
.CERT
Note: There is no real correlation between the file extension and encoding. That means a .crt file can either be a .der encoded file or .pem encoded file.
Question – How do I know if you have a .der or .pem encoded file?
You can also open the file and if it is ASCII text then it is a .PEM encoded certificate
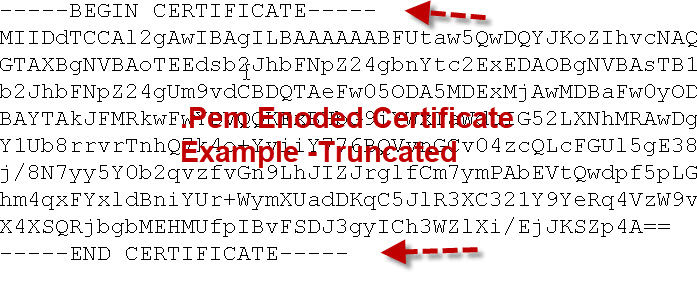
Certificate Examples
Because .pem encoded certificates are ASCII files they can be read using a simple text editor.
The important thing to note is that they start and end with the Begin Certificate and End Certificate lines.
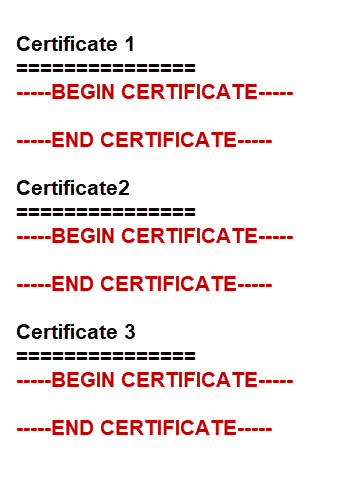
Certificates can be stored in their own file or together in a single file called a bundle.
Root CA Bundle and Hashed Certificates
Although root certificates exist as single files they can also be combined into a bundle.
On Debian based Linux systems these root certificates are stored in the /etc/ssl/certs folder along with a file called ca-certificates.crt.
This file is a bundle of all the root certificates on the system.
It is created by the system and can be updated if new certificates are added using the update-ca-certificates command. See here
The ca-certifcates.crt file looks like this
The certs folder also contains each individual certificate or a symbolic link to the certificate along with a hash.
The hash files are created by the c_rehash command and are used when a directory is specified, and not a file.For example the mosquitto_pub tool can be run as:
mosquitto_pub --cafile /etc/ssl/certs/ca-certificates.crt

or

mosquitto_pub --capath /etc/ssl/certs/
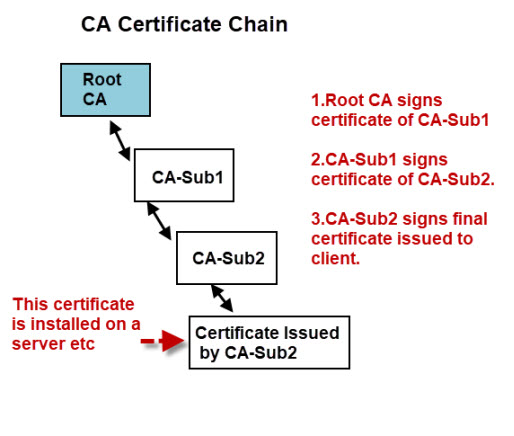
Root Certificates, Intermediate Certificates and Certificate Chains and Bundles.
A certificate authority can create subordinate certificate authorities that are responsible for issuing certificates to clients.
For a client to verify the authenticity of the certificate it needs to be able to verify the signatures of all the CAs in the chain this means that the client needs access to the certificates of all of the CAs in the chain.
The client may already have the root certificate installed, but probably not the certificates of the intermediate CAs.
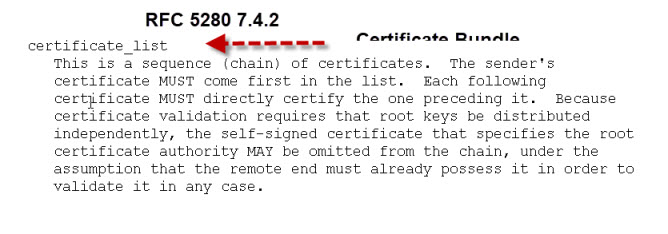
Therefore certificates are often provided as part of a certificate bundle.
This bundle would consist of all of the CA certificates in the chain in a single file, usually called CA-Bundle.crt.
If your certificates are sent individually you can create your own bundle.
If you are experiencing problems with a certificate chain then this site has a test tool and provides details on how to fix the problem
Common Questions and Answers
Q- What is a trusted store?
A- It is a list of CA certificates that you trust. All web browsers come with a list of trusted CAs.
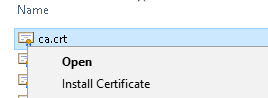
Q- Can I add my own CA to my browser trusted store?
A- Yes on Windows if you right click on the certificate you should see an install option
Q- What is a self signed certificate?
A- A self signed certificate is a certificate signed by the same entity that the certificate verifies. It is like you approving your own passport application. see wiki
Q What is a certificate fingerprint?
A- It is a hash of the actual certificate, and can be used to verify the certificate without the need to have the CA certificate installed.
This is very useful in small devices that don’t have a lot of memory to store CA files.
It is also used when manually verifying a certificate.


